Today’s workers typically don’t have a fax machine they can use regularly. So, what happens when you need to send a fax at a moment’s notice? The solution comes from online fax services that support mobile applications.
This guide will walk you through how to send and receive free fax from an iPhone. All you need is your phone, an internet connection, and one of the leading fax apps you can download today.
Table of Contents
What Are the Benefits of iPhone Faxing?

Many offices and organizations still use fax for everyday productivity. If you need to send a fax immediately, you don’t have to visit Staples, UPS, or Office Depot to get it done. Using an online fax service that has a standalone iOS app gives you these unique advantages:
Convenience and accessibility
With a mobile fax app, you wouldn’t need a legacy fax machine to send and receive fax transmissions from an iPhone. You also wouldn’t need to scramble to find a nearby fax machine. You can work on the go and stay productive because the best mobile fax apps notify you of incoming faxes in real time.
Mobile productivity
The iPhone has become a powerhouse for productivity on the go. It often is the most powerful computer you can access at any given time, so it makes sense to take advantage of that. When you fax from your iPhone, you get a solid user experience that holds up to any desktop or laptop.
Security and confidentiality
Manage your documents confidently, as the top online fax apps use 256-bit end-to-end encryption and secure cloud-based storage. These features ensure that your account and data remain secure at every turn.
Flexible pricing plans
Some online fax services offer monthly subscriptions and pay-per-fax pricing models. These versatile payment plans can help you avail of a service that makes sense for your business. In addition, it will cost you significantly less than a fax machine.
Sustainable business practices
Online faxing eliminates excess paper and ink usage. Not only will it help you save on overhead costs, but it will also ensure that your business supports the global fight against climate change. Another positive outcome is that you can save on office space that would typically go to a fax machine and its related supplies.
How to Start Faxing on an iPhone With iFax
- Visit the Apple App Store and download iFax.
- A window will pop out that lets you generate a unique fax number.
- You may also avail of the Plus or Professional plans. These let you send and receive 500 pages of faxes and more.
- Your fax number will become activated as you begin your free trial.
- Next, you should see the iFax dashboard as your main screen for sending, receiving, and managing faxes.
- Tap the sample document or create one of your own to send a fax.
- Fill in the fax cover page with the necessary details. You may choose between the available cover pages to see which one you like best.
- Once done, click Send and wait for a notification alerting you of a successful or failed fax transmission.
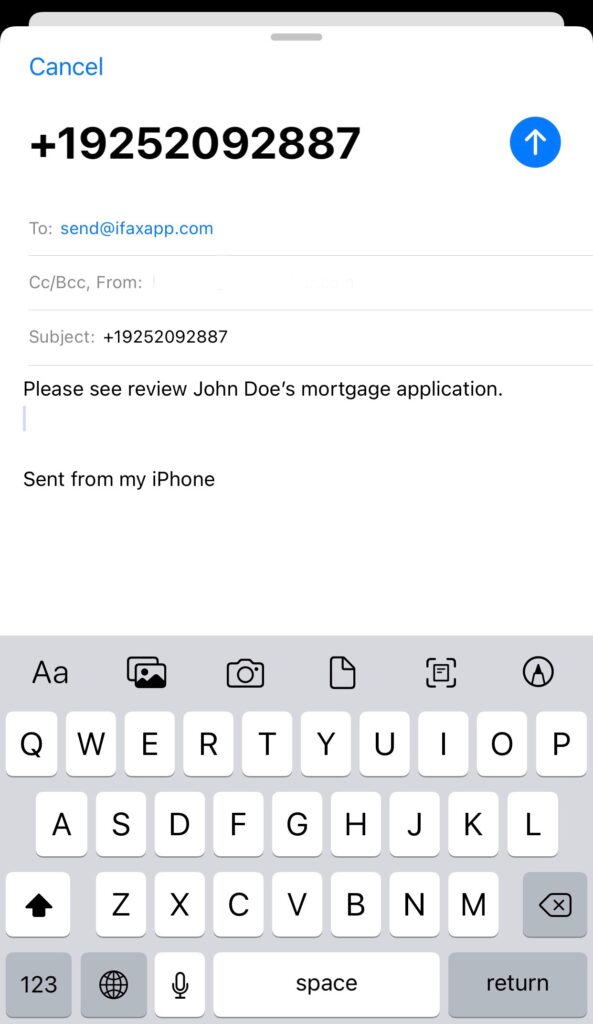
Send a fax from your iPhone via email

- If you already have iFax installed on your iPhone, you may register or log in to your account. Otherwise, visit iFax to get started with the free trial and generate a fax number.
- The email address you used to register is the same email where you’ll receive notifications of incoming faxes. Open your chosen Mail client on your iPhone and fill out the required fields.
- Next, type send@ifaxapp.com in the To field and the subject line.
- Then, enter the recipient’s fax number. Don’t include dashes or spaces. You may add comments in the email body and attach the files you want to fax.
- Click Send, and iFax will transmit your faxes to the recipient. The app will send you an email notification to confirm transmission success.
As we’ve demonstrated, iFax offers two quick and easy ways to send and receive faxes from your iPhone. It can become a powerful addition to your workflow as you can carry it wherever you go. Whether in the office or on a business trip, online faxing ensures you’ll never be without a professional communicat
Try iFax for Easier Faxing on an iPhone
With iFax, sending a fax from your iPhone is as easy as sending a text message. The ability to conveniently send and receive faxes online will make you more productive wherever you are. The best part? You can activate automatic sync to Google Drive, Dropbox, or OneDrive so that you never lose track of a single fax.
Considering free fax options allows you to see how easily you can utilize mobile faxing on the go. Sign up for an iFax account and enjoy a free trial to experience a better way to use online faxing on your iPhone. The iFax app for iPhone is available on devices running iOS 11.0 or later.


